
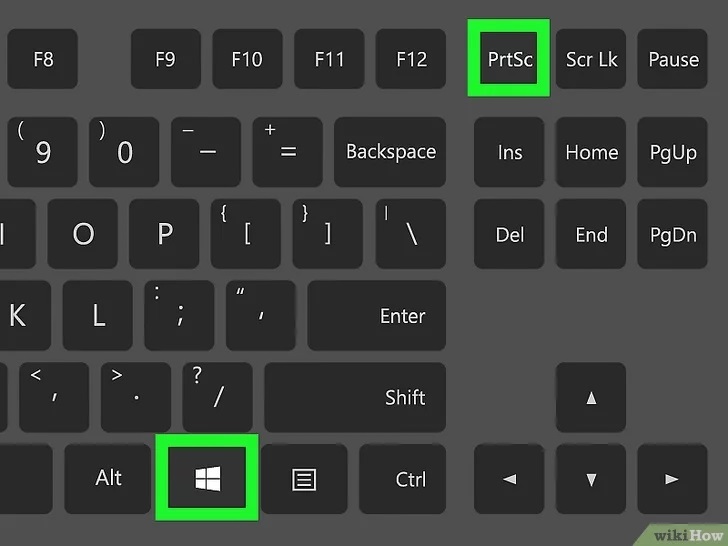
To screenshot on a Lenovo laptop, simply press the “Windows” and “Print Screen” buttons simultaneously. Capturing screenshots on your Lenovo laptop is a quick and convenient process.
With just a combination of two buttons, you can easily capture and save images of your screen. This feature comes in handy when you want to capture important information, save a funny meme, or document a technical issue for troubleshooting purposes.
We will guide you through the steps to take screenshots on a Lenovo laptop. We will also discuss alternative methods such as using the Snipping Tool or keyboard shortcuts. So, let’s dive in and become a master of capturing screenshots on your Lenovo laptop!
We will guide you through the steps to take screenshots on a Lenovo laptop. We will also discuss alternative methods such as using the Snipping Tool or keyboard shortcuts. So, let’s dive in and become a master of capturing screenshots on your Lenovo laptop!
Understanding The Basics Of Screenshots

There are different methods of capturing screenshots on a Lenovo laptop, and understanding the basics is vital. One of the most convenient ways to take a screenshot is by using the built-in screenshot feature. With this feature, you can easily capture and save anything displayed on your screen, be it an important document, an error message, or an interesting article.
| Method | Description |
| Using the PrtScn (Print Screen) key | Pressing the PrtScn key captures the entire screen. You can then paste it in an image editing software or document. |
| Using the Alt + PrtScn combination | This captures only the currently active window or application. |
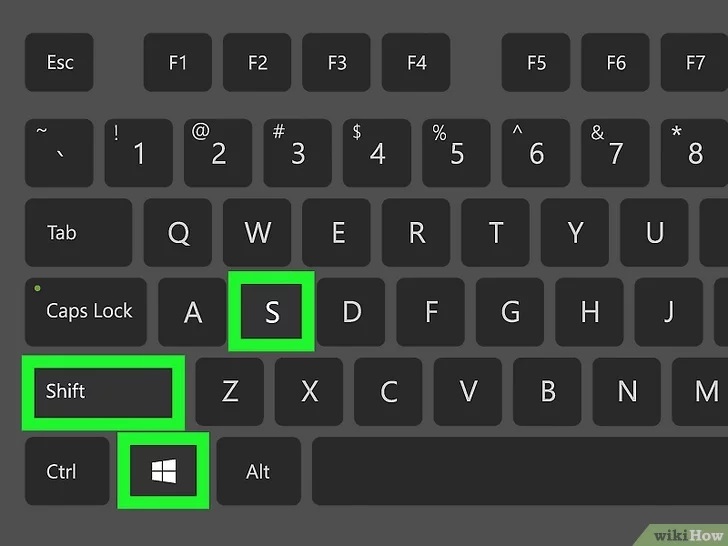
| Using the Windows + Shift + S shortcut | A snipping tool will open, allowing you to select a specific area for capturing. |
The importance of taking screenshots on a Lenovo laptop: Screen capturing is a powerful tool that can benefit Lenovo laptop users in several ways. Firstly, it allows you to quickly save and share information without having to copy-paste or type it out manually. Screenshots are also valuable for troubleshooting technical issues as they provide visual evidence of errors or glitches. Additionally, screenshots are useful for creating tutorials, presentations, or documentation as they can effectively explain complex processes or concepts.
The built-in screenshot feature on Lenovo laptops offers several advantages. Firstly, it eliminates the need for third-party software, saving you time and effort. Secondly, it provides a straightforward and intuitive interface for capturing screenshots, making the process much more seamless. Lastly, it allows you to annotate and edit your screenshots easily, ensuring that you can customize and enhance your captured images to suit your specific needs.
Built-in Screenshot Options On Lenovo Laptops
Lenovo laptops come with built-in options for taking screenshots, making it convenient and easy to capture what you need. One way to capture your screen is by using keyboard shortcuts. By pressing the Windows key + PrtScn, you can instantly capture your entire screen and save it as an image file. To capture a specific area, you can use the Windows key + Shift + S shortcut to open the Snipping Tool, which allows you to select and save specific areas of your screen. Another option for taking screenshots is to use the Windows game bar. Simply press the Windows key + G to open the game bar, then click on the camera icon to capture a screenshot. These built-in options make it quick and easy to take screenshots on your Lenovo laptop, saving you time and effort.
Capturing Screenshots Of Full Screens
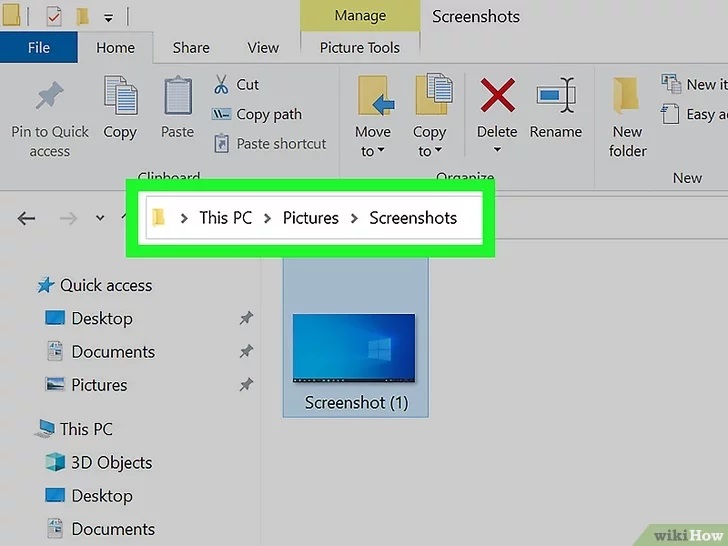
To capture a screenshot of the entire screen on your Lenovo laptop, use the PrtScn key. This key is commonly found on the top right corner of the keyboard. Simply press the PrtScn key once and the screenshot will be saved to the clipboard. You can then paste it into an image editing software, such as Paint, and save it as an image file. If you frequently take screenshots and want to customize the default save location, follow these steps:
- Go to the Start menu and open the Settings app.
- Click on “System” and then select “Screen” from the left-hand menu.
- Scroll down and click on “Clipboard” on the right.
- Under the “Clipboard history” section, toggle on the “Save screenshots automatically” option.
- Choose a folder where you want the screenshots to be saved.
By customizing the default save location, you can easily access your screenshots and organize them in a way that suits your needs.
Capturing Screenshots Of Specific Windows Or Applications
If you want to capture screenshots of specific windows or applications on your Lenovo laptop, there are a few methods you can use. One common shortcut is Alt + PrtScn, which captures a screenshot of the active window and saves it to the clipboard.
You can then paste the screenshot into an image editing software or a document. Another option is to use the Snipping Tool, a built-in Windows utility that allows you to capture screenshots of individual applications or specific areas of the screen. With the Snipping Tool, you can easily highlight and annotate the captured screenshots before saving them.
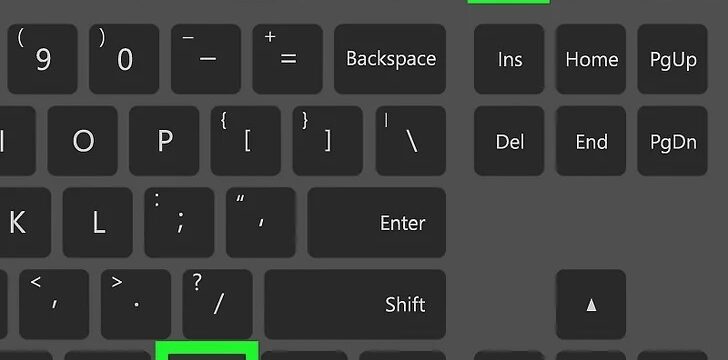
Capturing Screenshots Of Specific Areas
In this blog post, we will explore how to capture screenshots on a Lenovo laptop. Let’s begin by focusing on capturing specific areas of the screen. One method to achieve this is by utilizing the Snipping Tool, a built-in tool in Windows. With the Snipping Tool, you can select and crop specific areas of the screen, allowing for precise screenshot captures.
This is particularly useful when you only need to capture a certain portion of the screen instead of the entire display. Furthermore, once you have captured the desired screenshot, you can enhance it by annotating it. By adding text, shapes, or highlighting important areas, you can make your screenshot clearer and more effective for communication purposes. This is especially helpful when you need to provide instructions or demonstrate specific details to others.
Saving And Managing Screenshots
When it comes to taking screenshots on a Lenovo laptop, it’s essential to know how to save and manage them effectively. Choosing the ideal file format for your screenshots is the first step. Lenovo laptops generally offer various file format options, such as JPEG, PNG, or GIF. Each format has its own advantages, so consider your needs before selecting one. Once you have taken the screenshots, it’s important to organize them in dedicated folders. Creating separate folders based on categories or projects can help keep your screenshots easily accessible and prevent them from getting lost or mixed up.
Furthermore, consider using a consistent and logical naming convention for each screenshot to make searching for them a breeze. Another convenient option for managing screenshots on your Lenovo laptop is to utilize cloud storage solutions. Services like Google Drive, Dropbox, or OneDrive allow you to store your screenshots securely in the cloud. This not only frees up storage space on your laptop but also provides the flexibility to access your screenshots from any device with an internet connection.
Editing Screenshots For Enhanced Clarity
Screenshots are a useful tool for capturing important information on a Lenovo laptop. To enhance the clarity of your screenshots, consider applying basic editing options. One effective technique is to add text, arrows, and shapes to highlight important elements. This can help draw attention to specific areas or provide additional context.
Furthermore, adjusting the brightness and contrast of your screenshots can enhance visibility and make details stand out. Finding the right balance can greatly improve the overall quality of your screenshots. Remember to experiment with different editing options to obtain the desired results. By maximizing the clarity of your screenshots, you can effectively convey your message and engage your audience.
Printing And Sharing Screenshots
Screenshots are a useful tool for capturing and sharing information on your Lenovo laptop. One way to use your screenshots is by printing them directly from your device. To print a screenshot, simply open the image file, click on the print option, and select your desired printer settings. This allows you to have a hard copy of important information or images.
Another way to utilize your screenshots is by sharing them with others. One option is to share screenshots via email or messaging platforms. Simply attach the screenshot file to your message and send it to the desired recipient. This is particularly useful for providing visual explanations or highlighting specific details. You can also upload your screenshots to social media or image hosting sites, making it easy to share them with a wider audience. Whether you want to showcase a successful achievement, share a funny moment, or seek assistance, uploading screenshots to these platforms allows for easy access and interaction.
Troubleshooting Common Screenshot Issues
In order to successfully take a screenshot on your Lenovo laptop, it is essential to troubleshoot common issues that may arise. One common problem is encountering black screenshots. This issue can be caused by temporary file location problems. To resolve this, check the default location where screenshots are saved and ensure it is accessible. Another potential cause for black screenshots may be outdated or incompatible drivers. It is important to stay up to date with the latest driver versions for your laptop’s display and graphics. Updating these drivers can often lead to smoother screenshot capturing.
Advanced Screenshot Options For Enhanced Productivity
Are you searching for advanced screenshot options to enhance your productivity on a Lenovo laptop? Look no further. Utilizing third-party screenshot software with advanced features can provide you with a range of benefits. These tools enable you to capture screenshots effortlessly and offer additional functionalities like annotation, editing, and sharing options.
Another useful feature is automating screenshot capturing through scheduled tasks. You can set up your software to automatically take screenshots at predefined times, saving you time and effort. This is particularly handy for tasks that require a series of screenshots to be captured at specific intervals. In addition to third-party software, Lenovo laptops also offer their own screenshot software built specifically for their devices. These Lenovo-specific tools are designed to provide users with a seamless and convenient screenshot experience tailored to their laptops’ hardware and features.
Tips And Tricks For Efficient Screenshot Workflow
One way to speed up your screenshot workflow on a Lenovo laptop is to learn and utilize keyboard shortcuts. For capturing the entire screen, use the Win + PrtScn combination. To capture just the active window, press Alt + PrtScn. These shortcuts instantly save the screenshots in the designated folder, allowing for quick and convenient access to your captures. Adjusting your system settings can significantly improve the speed and efficiency of capturing screenshots.
Ensure that the “Save screenshots using game DVR” option is disabled in the Xbox Game Bar settings. Disabling this option prevents any delay when saving screenshots. Additionally, you can modify the default screenshot folder location to a more accessible location on your computer. If you have multiple monitors connected to your Lenovo laptop, take advantage of the extended screen real estate to enhance your screenshot workflow. By extending your display, you can have your editing software and capture tool open simultaneously, simplifying the editing process. This enables you to work more efficiently and effectively, saving time and increasing productivity.
Conclusion
In this post, we have explored the step-by-step guide on how to take a screenshot on a Lenovo laptop. By following these simple instructions, you can easily capture and save important information, images, or moments on your device. Whether you need it for work, school, or personal use, taking screenshots on your Lenovo laptop is a convenient and useful feature.
Start using this tool and enhance your productivity today!
Leave a Reply Cancel reply